
Janome HD1000 Review
I abuse my sewing machines. A lot. I put all sorts of stuff through my cheap old 90s-era Target Singer that I probably shouldn’t have: vinyl, foam, leather, canvas, plastic… I sewed a lot of weird stuff! When I upgraded to my fancy new Pfaff I was a little more cautious. I’ve still put vinyl and heavy webbing and stuff through it, but I’ve tried to be gentle. Which is why when I was commissioned for a weird-material project and I was faced with the choice between joining a makerspace for a few months or buying a machine, I jumped at the chance to buy a new machine!
My specific project that prompted the purchase was a carpetbag made of actual carpet. I don’t plan on sewing a lot of carpet after this project but I do plan to make more bags and weird cosplays, so I’ll be sewing marine vinyl, faux and real leather, heavy interfacing, possibly denim or canvas, straps, maybe fur, who knows what else! This wasn’t going to be my primary machine - garments will always be my main focus - so I didn’t want to spend a ton on it, but I wanted something reliable that would last through whatever abuse I threw at it.
After much research I settled on the Janome HD1000. I don’t have the space or the money for a big industrial, and the Janome HD3000 is consistently well reviewed as one of the best, affordable, heavy duty machines for home use. The primary difference between the HD1000 and HD3000 was that the 1000 has a front-load bobbin, while the 3000 has a drop-in bobbin. That and about $125. For $125 less I figured I could live with the front-load.
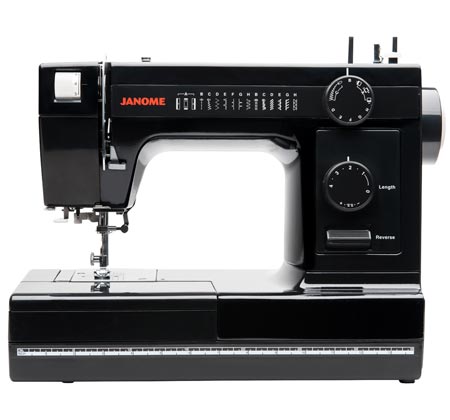
Photo from Janome's product page
I picked up the HD1000 Black Edition on Amazon for $329. According to the Janome website, the standard HD1000 retails for $299, the Black Edition for $550, so I was pretty thrilled with this find! The Black Edition, in addition to its sexy black finish, comes with an Ultra Glide Foot and Even Feed Foot (~$70 value), extra leather needles, patterns for a bag and a top, and stickers! STICKERS!!! All of those things are missing in the standard HD1000.

Stickers!!!
Two days after ordering, it was in my living room! My first impressions were that it is beautiful in a classic industrial way. It’s a very no-frills mechanical machine - dials for stitch, stitch length, and thread tension, a great big reverse button, and that’s about it. And that glossy black finish is spectacular! So different and so pretty!

The small mechanical Janome compared to my larger electronic Pfaff
I started with a test run of two layers of glitter vinyl using the included standard foot, teflon foot, walking foot, and a roller foot I’d picked up at my local sewing machine shop. It sewed through the vinyl like butter! The stitches were even and clean and perfect! The walking foot is big and clunky (I’m used to the Pfaff IDT system) but it did its job well. The teflon and roller feet were smooth and easy, and the standard foot sucked just as much as usual on vinyl. The presser foot has a nice, extra high lift distance so you can feed a big stack of fabric. And this thing packs a 1 amp motor (compared to the Pfaff’s 0.5 amp) so it punches through thick materials with more force than a standard machine.
Next up: The real test. Carpet! I was using remnants of recently-removed hotel carpet. It was thick and dense and, frankly, kind of gross. I’d scraped off the original foam backing and glued on felt. My original pattern design used a single piece of carpet for the front, bottom, and back; and individual panels on each side. Unfortunately, the carpet's thickness was more than half of the pressure foot's lift height, so I wasn’t able to sew carpet to carpet. I altered my pattern to use carpet front and back panels and a single piece of upholstery for the sides and bottom. I used heavy polyester upholstery backed with extra firm fusible interfacing. Carpet to upholstery sewing was successful! But it wasn’t easy at first. The bobbin thread was quick to tangle and the needle didn’t always want to go through. After much trial and error I realized something important: this fabric and this machine are way less forgiving than what I’m used to. The bobbin tension had to be exactly right to prevent tangling, the needle had to be big enough and sharp enough to puncture the heavy carpet backing, and the carpet dulled the needles very quickly. Once I figured out all of those things, It was golden. The only thing I couldn’t sew through, even with brand new needles, was the seam. Otherwise, with the right combination of tension and needle, the stitches were fast and clean!
his bag’s straps are a heavy 1/8" leather, which I was not able to sew through and wound up hand sewing on to the carpet panels. In retrospect, a new needle might have solved that problem. Really, it took me an embarrassingly long time to think of changing the needle! I could have saved myself HOURS of frustration if I’d changed the needle more frequently! I might go back and test that theory later.
Aside from its persnickety nature, the only other thing I didn’t like about the machine, ironically, was one of it’s original selling points: the black finish. It’s so beautiful from a distance, but when it’s in use it’s just too dark, and the dim incandescent light bulb doesn’t help much. I plan to replace it with an LED at some point.
All in all, once I got over the learning curve, this was a good machine. I’ll probably never sew carpet again so this might be the worst abuse I put it through. But bring on the glitter vinyl!!!!!

This blog was originally posted July 31, 2017 on a different platform