
Fun with fabric paints!
I recently finished building the Sanderson Sisters' dresses from Hocus Pocus, which involved a LOT of fabric painting! And a lot of fabric paint testing. I thought I'd share my findings... :)

Mary, Winnie, and Sarah Sanderson
Mary's costume was the easiest of the three, and took the least amount of color mods. All of my fabrics were pretty screen accurate out of the box, I just needed to add a little bit of aging and weathering. For that I used Tulip Color Shot Instant Fabric Color spray paint in brown and Tulip Soft Matte Fabric Paint in chocolate. From a distance, I sprayed a light mist of the spray paint over everything. And using a paper towel, I rubbed a light coat of the liquid paint into the seams and edges of the pieces. The result was subtle but it made everything look kind of old and kind of worn. I failed to get good before and after pictures of the painting, so you're going to have to just trust that it was awesome :)
Mary's apron on screen was a multi-colored purple-hued knitted thing. I don't knit and I couldn't find the fabric I needed (although I swear I've seen it somewhere before!) so I commissioned it from a friend who knits. She used a multi-colored, multi-textured raw silk yarn which looked mostly purple when it was in the ball but looked much brighter and more colorful when the apron was finished. I covered the entire apron with a light coat of Tulip Color Shot in purple, and it came out pretty perfect.

Mary's rings at the bottom of her corset were 3D printed in a dark grey PLA and painted with Tamiya acrylic model paint in a mix of gold, bronze, and metallic brown. (I know this post is all about fabric paints, but Tamiya is my favorite metallic paint for just about everything! And I used in on some of the other fabrics. Keep reading...)
Sarah's corset color was a special challenge. It's a confusing color on screen - it looks like it maybe was pink once but had been exposed to 200 years of dirt and was now some pink-brown-mauve-lavender-mystery color. I dyed the fabric a kind of dull salmon color, made the corset, and then misted her entire costume with the same brown spray paint that I used on Mary. Unfortunately Sarah's synthetic silk didn't take the paint as well as Mary's polyester velvet, and her corset came out kind of splotchy and mottled and awful. I scrubbed it with soap and water, ran it through the washing machine, and went over the entire thing with Tamiya pink, which probably wasn't the best paint choice but it's what I had available in my paint collection at that moment. And when all that was done and it was back to a tolerable dirty pink, I finished it by highlighting the seams and edges with the same liquid brown paint I used on Mary. In retrospect, I wish I hadn't used the spray paint. I should have just used the liquid for more focused and deliberate aging.
VALUABLE LESSON: TEST EVERYTHING FIRST!!!!!!!!!! Because there's no feeling quite like almost destroying your near-finished product that you've put countless hours of work into :(
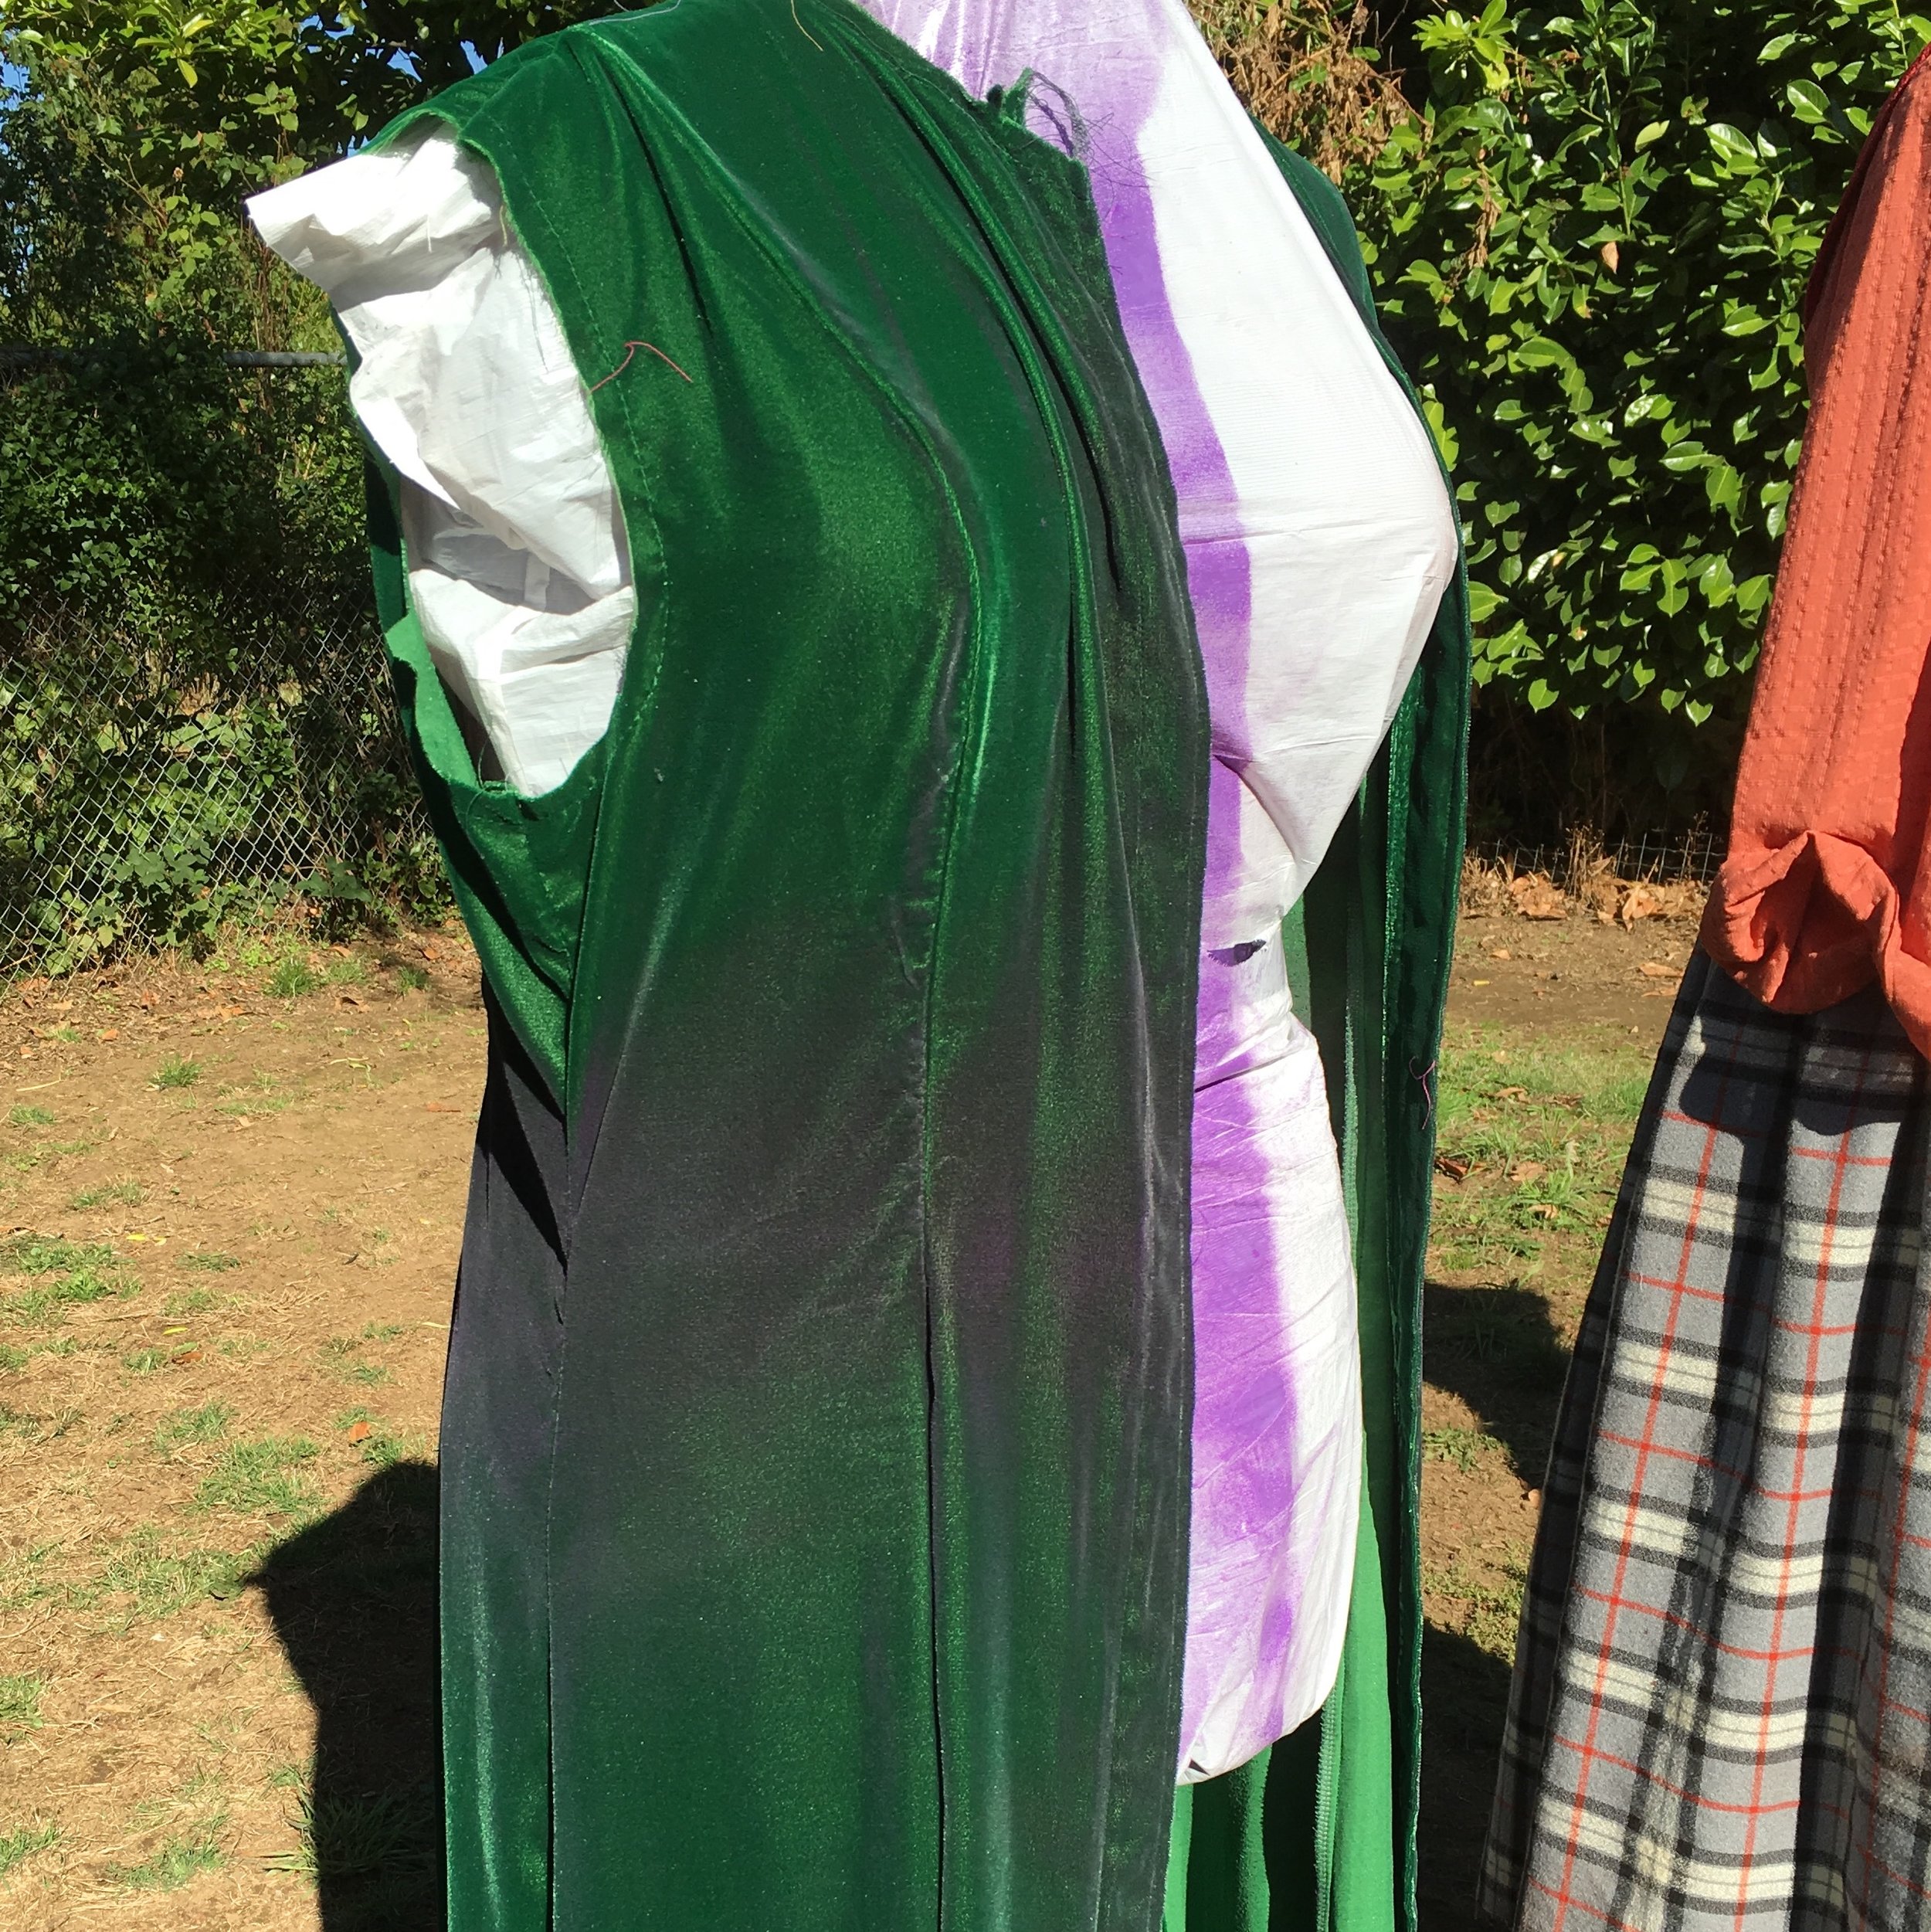
Winnie was where all the painting fun happened! Her coat, obviously, has a bunch of symbols painted on, but her coat and dress also have some neat purple highlights. Her skirt hem has a blotchy purple dip-dye look to it, which I couldn't really duplicate with dye, no matter how many different combinations of dye remover, bleach, and dye I used. The trick is probably to start with white fabric and dye the purple ends and the green body independently. But I started with green fabric and no matter what I did, my purple came out looking brownish. So I painted! I used Tulip Soft Matte again, and sponged it on around the bottom and swiped up to make a nice gradient. I have a friend who got married outdoors and wore a lovely, simple, off-white satin gown. It rained and she decided to just let the mud happen around her, and she ended the night with a perfect ombre of muddy brown hemline blending up to the off-white satin. As I was trying to figure out Winnie's skirt I thought, what if this crazy old witch had been dragging her skirt around purple magics for the last 200 years? It would look exactly like my friend's wedding dress! So that's what I did :)

Winnie's coat has the same purple magic stains to it, all around the front, bottom, and sleeve edges, and around the waist. For that I used purple Tulip Color Shot, the same stuff I used on Mary's apron. Again, I sprayed a very light coat from a distance, and I ended up with a very pretty subtle color variance.
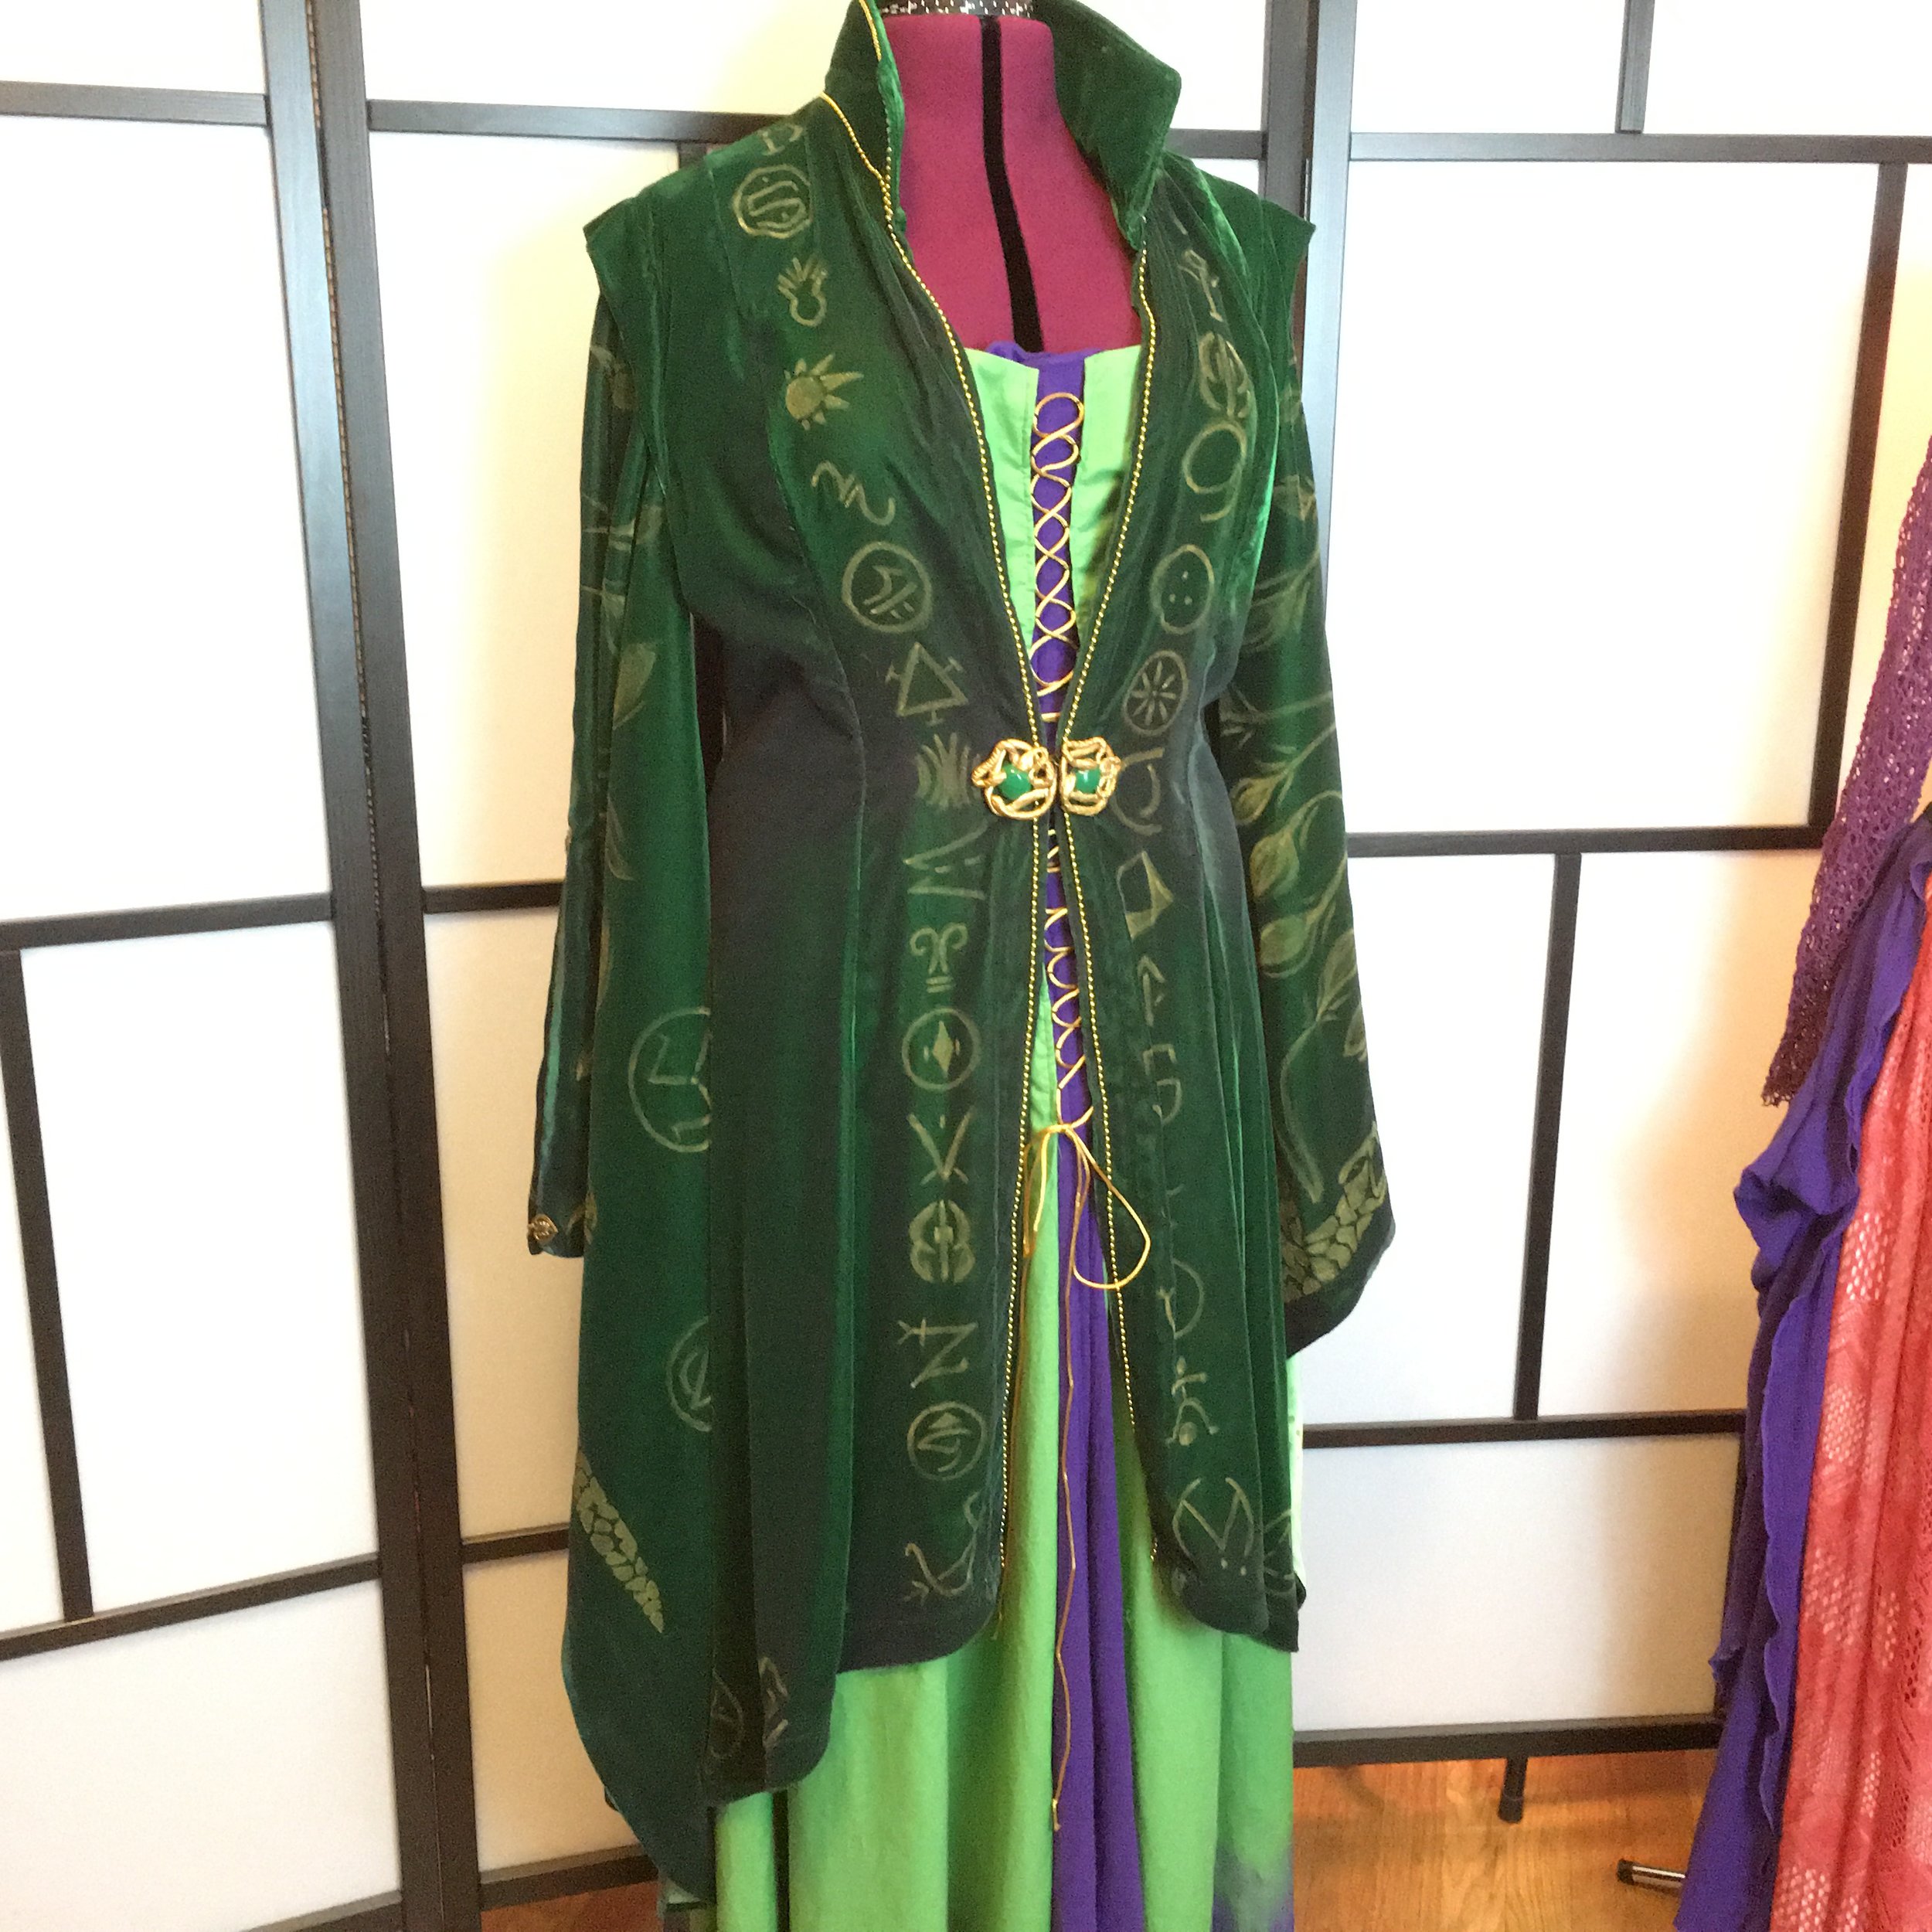
But the best part of the whole costume, and possibly the most fun to make, were the gold coat accents! She has serpents on her back hemline and sleeve cuffs, viney flowers on her sleeves, birds at her back waist, and symbols on her back, down the front edges, and along the front hemline. After nailing down the designs for all of these elements, the first major challenge was, how do you even paint on velvet? Obviously it can be done, because velvet Elvis paintings are a thing, and I have a beautiful velvet painting of C-3PO on my mantle that I bought from a local artist at a craft fair a few years ago, so it is possible! I found a bunch of gold paint and ran some tests:
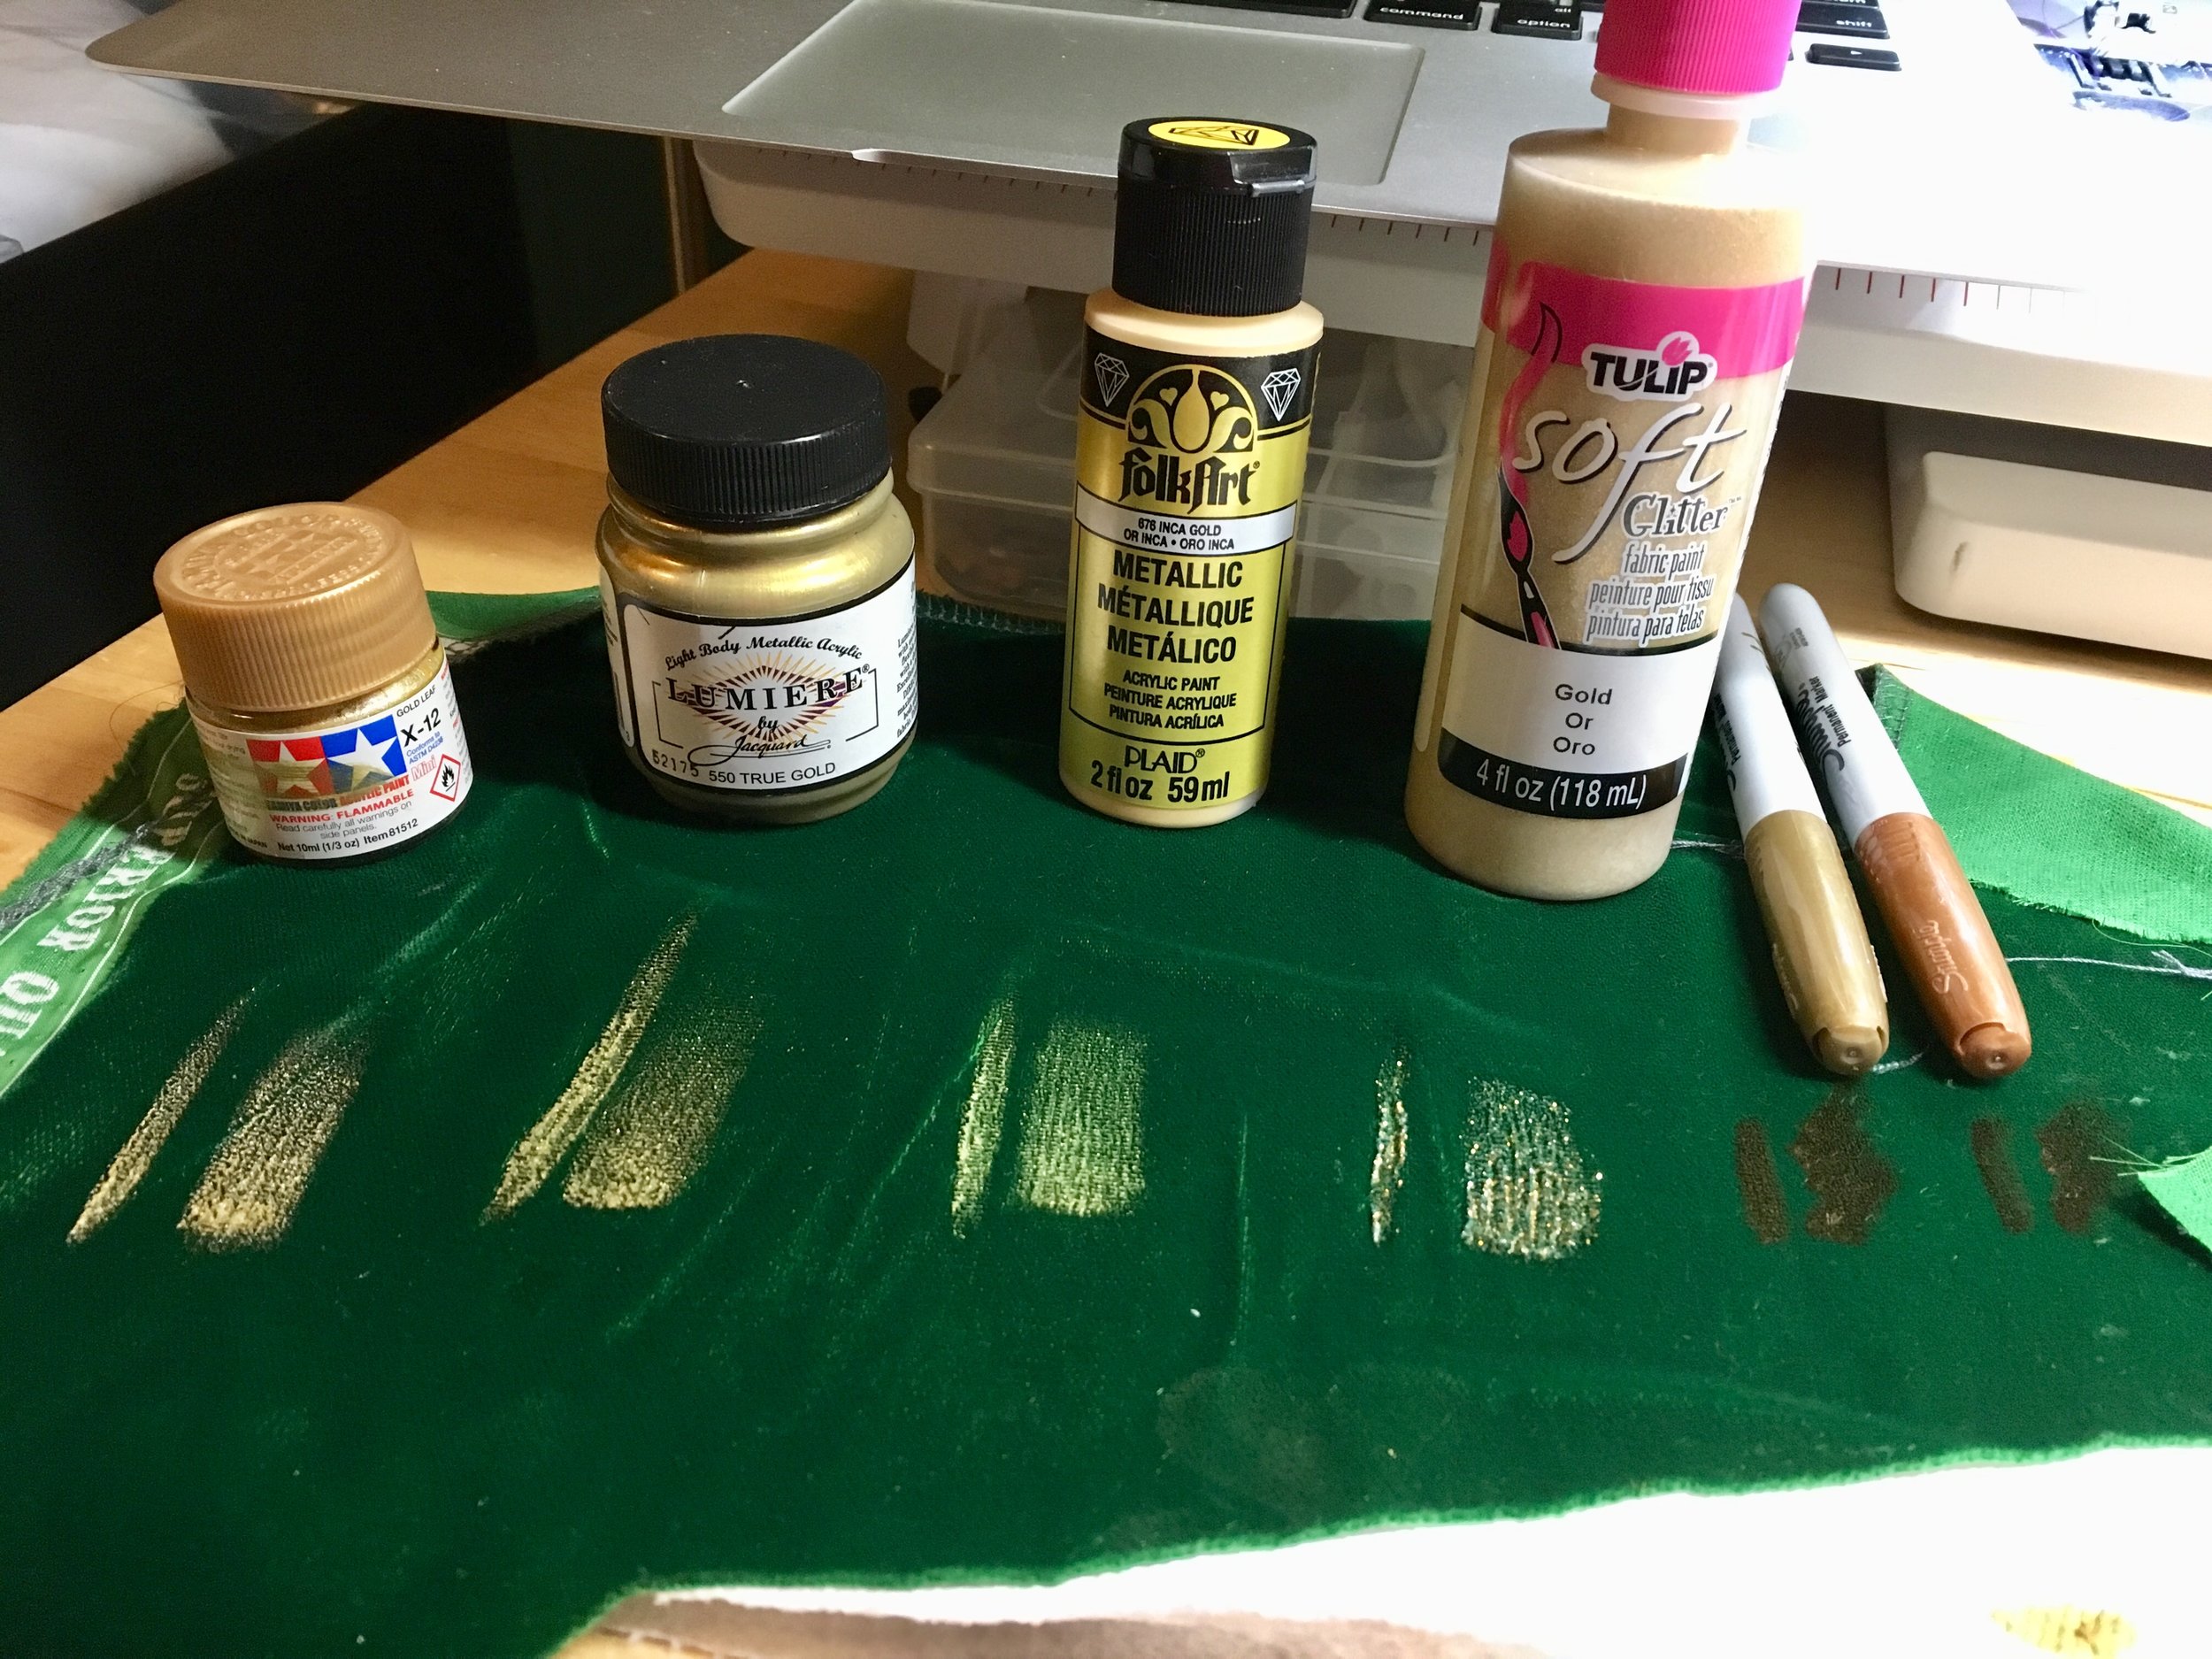
As you can see, Tamiya and Lumiere were the best, Folk Art was too light, Tulip was way too glittery, and sharpies were worthless. I went with Lumiere because it came in a bigger bottle and was sold in a store closer to my house. It also dried a little softer and more flexible than the Tamiya.
I painted the serpents with a stickyback vinyl stencil that I cut with my Cricut. I've used this method with great results on smoother fabrics, but velvet is so plush. The vinyl didn't stick well and the paint bled out under the stencil very easily. To make this work I had to paint mostly in stabby motions, and be very aware of my brushstroke direction when I painted in brushy motions, and I was constantly checking that my vinyl was still stuck. The paint still bled and I lost some detail but overall I'm happy with how it turned out.


Everything else I painted on freehand. I used a circle stencil to make sure my symbols were evenly spaced, and a silver sharpie to lightly sketch the flower stem locations and a few other details, but otherwise it was all just eyeballed. The velvet really sucked up the paint on initial brush impact, so I had to do a lot of short strokes and had to apply lots of coats. And the velvet broke my brushes down very quickly, which resulted in fatter, sloppy lines. I wish I'd had a few more backup brushes. I have no idea how the velvet Elvis painters get that level of precision and detail! Velvet is a tough medium! But I'm happy with how it turned out :)

So, what did I learn?
- Tulip spray is good in the right situations and when applied with care.
- Tulip soft is great for cotton.
- Tamiya is great for just about everything.
- Folk Art is worthless. Seriously. Every time I try it I'm disappointed.
- TEST EVERYTHING FIRST!
- Always buy more paint that you need, because running out mid-project in the middle of the night sucks.
- Have backup brushes available.
- Respect the work other artists do. Even if it looks silly or kitchy or just doesn't suit your taste, that shit takes effort and skill! (But for real, I LOVE velvet Elvis paintings!)


